Pie Crust 101
In our busy lives we have to allow ourselves some short cuts. Pie crust is not one of them. The cool thing about my recipe is the fact it takes minutes to prepare. The longest part is letting it chill in the fridge. I always make extra dough so I can freeze it and pull it out when I want to make something. While there is a lot of debate as to which 'fat' (lard, shortening, butter, Earth Balance, Coconut Oil, etc) goes in the dough, I have to stick to my guns on this one. It is unsalted butter. Hands down. All the way. Not only does the crust turn out beautifully flaky, I find it easier to work with and for me, that's huge. The key in the flakiness is making sure not to work it too hard because the heat will cause the butter to soften too much thus reducing the layers in the dough. We don't want that!
Here is my recipe for Pate Brisee (or in other words, all butter pastry)
2 1/2 Cups All Purpose Flour
2 Sticks (1 Cup) Unsalted Butter (very, very cold and cut in chunks)
Ice Water
(for sweet pastry, like when I do pies or tarts I add 1/2 cup granulated sugar)
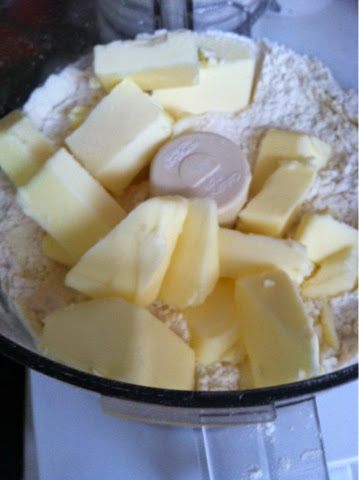
Check out my photos below to give an idea of the process. A food processor is your very best friend for this recipe. Dump your flour, sugar (if using) and butter in the bowl of your processor with the blade attachment. Pulse it until the mix has good sized peas in it. Don't overprocess. You want to see little chunks of butter (again, see photos below.)
SLOWLLLLLYYYY add your ice water just a little at a time (the amount will vary - usually a 1/4 cup or less is about right) through the top feed tube. Keep pulsing until dough is completely dampened. Now this is where I break a cardinal rule. I keep processing it until it begins to form a ball. That actually is kind of a no no in baking circles but for me, it works). Take it out and gather up all the dough. Divide it into 2 - 3 balls (depending what your want to make with it). In this case I made 3 because I was using 2 for a small pie and then I froze one for a future galette.
Wrap in plastic wrap, press into disc, let chill for 1 hour.
Next, flour your board when the dough is ready to roll out. Have your pan ready. Roll out into a circle gently, taking caution to make sure your rolling pin and board are floured well to prevent sticking. The dough will want to soften quickly. Do 1/4 turns on the dough which will help keep it in somewhat of a circle. Don't worry if you need to patch it or whatever. This is a rustic pie and you made the dough yourself so enjoy the beauty of your creation!
Gently lift the dough and place in your pan. Put in your filling and do the same rolling out process with the 2nd pie dough disc. Fold it over the top of the pie. I like to use scissors to shore up the edges and then I crimp the dough to seal it. Cut some steam vents in the top for air and lightly brush cream (gives it a lovely shiny finish) and raw sugar (adds a delightful crunch to the crust)
You at least have to try this. I promise, it really is easy and the flavor? Well, let's just say you won't be wanting store bought any time soon.
In my next post I'm going to talk about the filling I chose for this particular pie I made. Perfect timing as the season is just starting.


Comments
Post a Comment
I welcome comments but please if you are a hater, maybe keep it to yourself. In other words, don't be a dick.